This will clarify a lot of confusion behind why you hook up certain pins the way you do. For even more detailed information, take a peek at the datasheet for the Atmega 1(short version) (long version). You can tinker with your UNO without worring too much about doing something wrong, worst case scenario you can replace the chip for a few dollars and start over again.
The Uno board and version 1. Aynı gün kargo, taksit seçenekleri ve kapıda ödeme avantajlarıyla hemen satın alın.
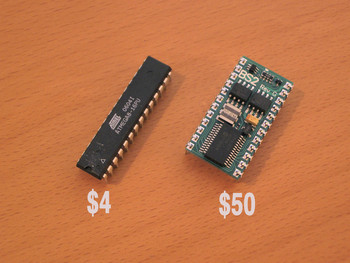
The exact part number is ATMEGA328P-PU. Arduino Software ( IDE) . Atmel has a line of Attiny chips that come in various sizes, depending on your needs. Even if it cost a little more it would still be a revolution because it has Bluetooth and WiFi built in. The processing hardware is generally entirely determined by which microcontroller chip the board uses, and . Includes Addicore Pinout Sticker. Buy the latest arduino chip GearBest.
We have taken the time to put the Uno bootloader on these bad guys, so if you need to replace or upgrade your chip it will be a snap!
You can find the same thing in your own computer, but in another form factor. Find this and other hardware projects on Hackster. All the rest are using soldered SMD ICs. The name says it all on this one. Make your own arduino board from a blank ATmega chip using this DIY project.
Make arduino board for your custom arduino projects. Need to re-program 16Uafter chip erase. Adafruit Metro vs ODroid-Cvs Asus Tinker Board. Powered by the RGS-servos and the RobotGeek Geekduino and Sensor Shield components Chip -E is a cute and lovable walking companion that you can build at home.
Using the image above as a guide lets begin to wire the chip. First connect GND and VCC, pins and respectivly. Connect the SDA pin on the 24LC256(pin 5) to the pin 4 . So this is basically a prototype. Since using an arduino board in every product might cost a lot I decided to use an atmel chip instead. I programmed my atmel chip with arduino board and arduino ide.
So my final product will have a chip and a led.

Our next major stage is to upload a bootloader onto the chip. The bootloader simplifies subsequent programming, as it accepts programming commands from the serial port. However we need another chip that supports SPI to burn the bootloader.
So at this stage we need another boar such as a Uno, . Every ATmega MCU (and not only) has a signature code. This is not unique for every single chip , but it is unique for every MCU type.